 Save
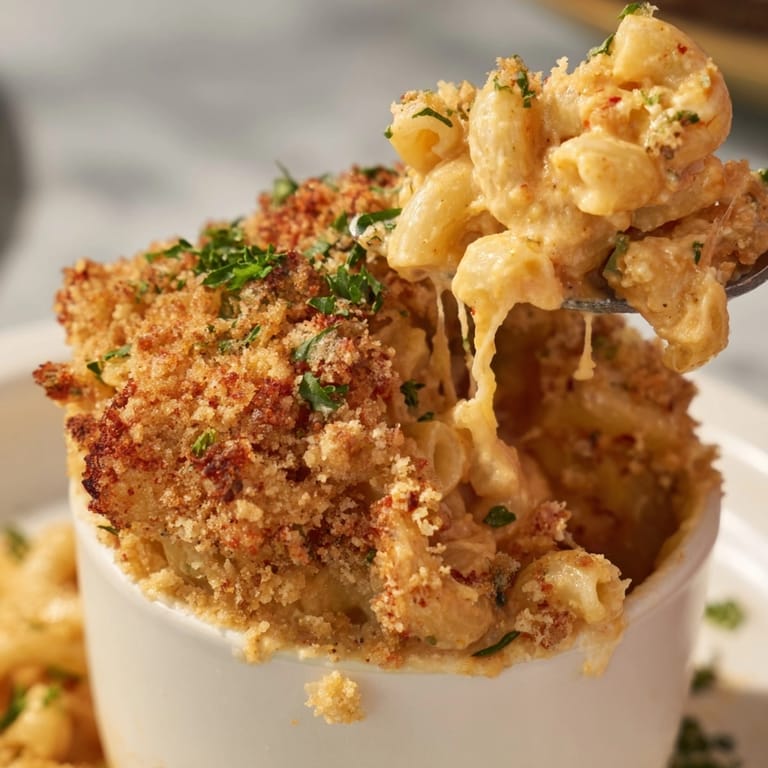
Save Cheesy, creamy, and full of bold roasted red pepper flavor, these Alfredo Roasted Red Pepper Mac Cups offer a fun twist on classic macaroni and cheese. Each golden cup is perfectly sized for snacking, parties, or tucking into lunchboxes. The combination of gooey cheeses and savory Alfredo sauce makes these bites irresistible and incredibly comforting.
I first whipped these up for my neighbor's game day and ended up with zero leftovers—everyone asked for the recipe. They quickly became our go-to comfort snack especially for potlucks and family movie nights.
Ingredients
- Elbow macaroni: Choose classic small elbows for best texture and even baking
- Unsalted butter: High quality butter creates a richer sauce
- All-purpose flour: Helps thicken the sauce for creaminess
- Whole milk: A full-bodied milk gives a velvety result
- Heavy cream: Added cream brings extra lushness
- Parmesan cheese: freshly grated for best melt and flavor
- Mozzarella cheese: For ultimate stretchiness and milky taste
- Fresh garlic: Minced fine for savory depth
- Alfredo sauce: Use a good-quality store-bought sauce or make your own for richer flavor
- Roasted red bell pepper: Chop very fine for sweet roasted notes and vivid color
- Salt: Essential for seasoning the noodles and sauce
- Ground black pepper: Adds a gentle bite to contrast the creaminess
- Smoked paprika: Optional but highly recommended for a subtle smoky note
- Large egg: Binds the pasta mixture so each cup sets properly
- Panko breadcrumbs: Choose Japanese-style for extra crunch
- Extra Parmesan cheese: For golden brown, nutty topping
- Fresh parsley: For a pop of herbal color when serving
Tired of Takeout? 🥡
Get 10 meals you can make faster than delivery arrives. Seriously.
One email. No spam. Unsubscribe anytime.
Instructions
- Preheat and Prep:
- Set your oven to 190 degrees Celsius or 375 degrees Fahrenheit. Take out your muffin tin and generously grease all 12 cups with butter or baking spray so your mac cups pop out easily later.
- Boil the Pasta:
- Fill a large pot with water and add a good pinch of salt to encourage flavor. Bring to a rapid boil and cook the elbow macaroni just until al dente so it stays firm during baking. Drain well and let cool slightly.
- Build the Cheese Sauce Base:
- In a medium saucepan over medium heat melt the butter until foaming. Add the minced garlic and stir gently for about one minute just until fragrant so it does not burn.
- Make the Roux and Thicken:
- Sprinkle in the flour and stir constantly for one minute to remove the raw taste. Gradually pour in the whole milk and heavy cream whisking the entire time for a lump-free silky sauce. Expect the sauce to thicken in about three to four minutes.
- Combine Cheeses and Flavor:
- Reduce the heat to low and stir in the Parmesan and mozzarella until they melt smoothly. Blend in the Alfredo sauce and the finely chopped roasted red pepper then season with salt black pepper and optional smoked paprika. Taste to adjust seasoning if needed.
- Bind and Mix:
- Take the sauce off the heat then fold in the cooked macaroni noodles. Pour in the beaten egg and mix everything thoroughly so each piece of macaroni gets coated and the egg blends well. This will act as the 'glue' that sets the cups.
- Fill the Muffin Tin:
- Spoon the cheesy macaroni mixture evenly among the 12 muffin wells. Use the back of your spoon to press each portion down gently so the cups will hold their shape.
- Make and Add Topping:
- In a small bowl mix together the panko breadcrumbs and extra Parmesan. Sprinkle over the tops of each unbaked mac cup for a crisp and cheesy finish.
- Bake Until Golden:
- Transfer the pan to your oven and bake for eighteen to twenty two minutes or until the tops look toasted and the edges pull away just a bit from the sides.
- Cool and Unmold:
- Allow the cups to cool in the tin for five minutes to set their shape. Take a thin paring knife and carefully run it around the edges of each cup before lifting them out gently. Garnish with parsley and serve while warm and cheesy.
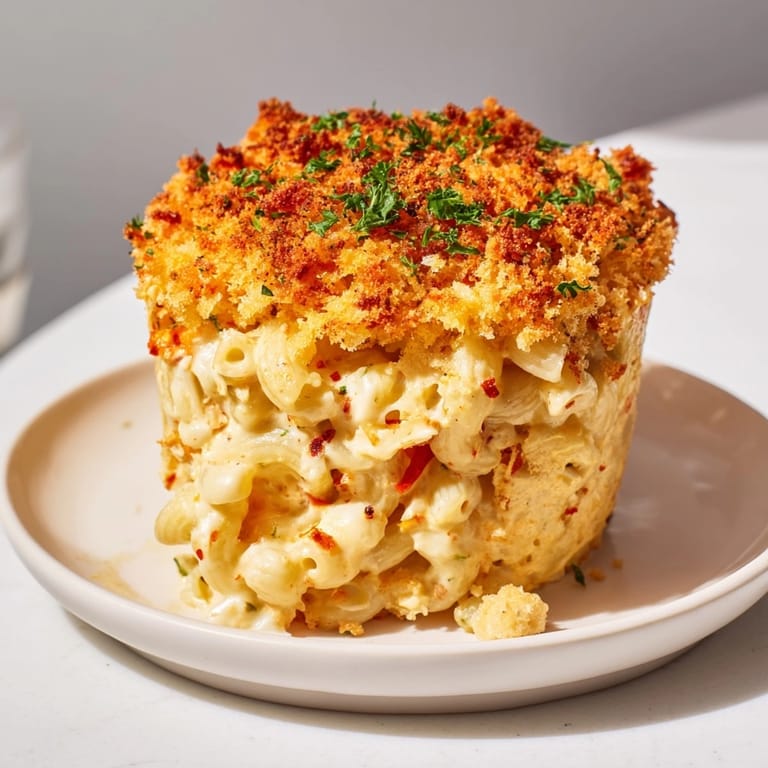
 Save
Save Parmesan is my personal favorite ingredient here because it creates that salty crust on top and melts right into the sauce. One time my youngest helped sprinkle the topping and we both giggled when the extra breadcrumbs made a perfect crunch.
Storage Tips
Once cooled completely place extra mac cups in an airtight container. Refrigerate for up to four days. For longer storage freeze mac cups individually on a tray then transfer to a freezer bag. Reheat in the oven or microwave straight from chilled or frozen.
Ingredient Substitutions
If you need a gluten-free version swap the pasta and breadcrumbs for gluten-free varieties. Substitute half and half for heavy cream if you want to lighten things up. Try mild cheddar or Gruyere instead of mozzarella for a different cheesy twist. Egg-free alternatives can be experimented with but may not hold together as firmly.
Serving Suggestions
Serve these cups as a party appetizer or after-school snack. They also make an adorable addition to lunchboxes. Top with a fresh spinach salad for a balanced meal or serve alongside tomato soup for extra coziness.
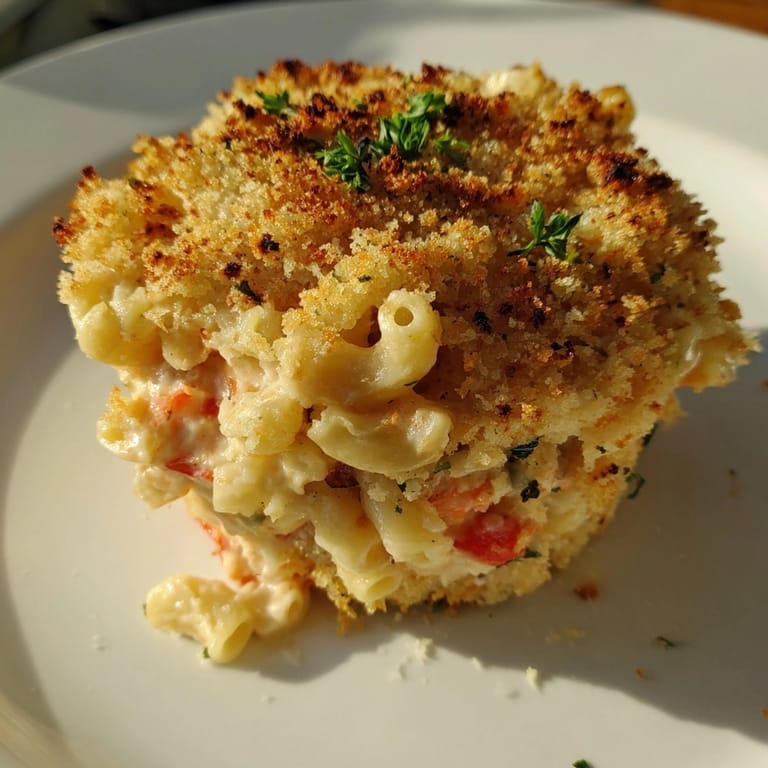
 Save
Save Serve warm for best cheese pull. These mac cups taste delicious both fresh and reheated.
Recipe FAQ Section
- → How do I get the cups to hold together well?
Mix macaroni with beaten egg and sauce, then press the mixture firmly into muffin cups. This ensures they hold shape after baking.
- → Can I make these ahead of time?
Yes, bake and cool fully, then refrigerate or freeze. Reheat in oven or microwave until warmed through for best texture.
- → Are gluten-free options possible?
Swap regular pasta and breadcrumbs for gluten-free versions to make these mac cups suitable for gluten-sensitive diets.
- → Which cheeses work best in this dish?
Parmesan and mozzarella create a creamy, melty texture. Other cheeses like cheddar can be used for different flavors.
- → How do I add a spicy kick?
Mix a pinch of red pepper flakes into the sauce for gentle heat, or serve with hot sauce on the side.
- → What's an easy way to remove mac cups from the pan?
Let them cool briefly, then run a small knife around the edge to loosen each cup before lifting out gently.