 Save
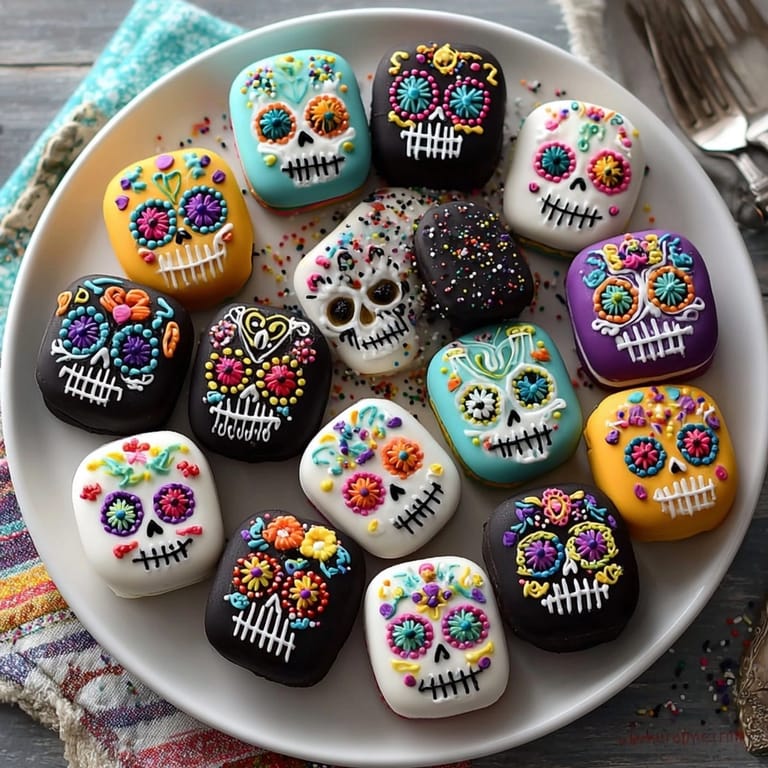
Save Sugar Skull Oreos are a showstopper for Día de los Muertos, Halloween, or any special party. Vibrant with royal icing and easy to decorate, these cookies turn classic Oreos into edible art that brings everyone together. Whether they are piled on a dessert tray or packed as edible gifts, they never fail to spark conversation and joy.
I remember my niece and nephew painting these for our family gathering a few years ago and their laughter at their "silly skulls" still makes me smile. Decorating together brings everyone into the tradition.
Ingredients
- Oreo cookies: Classic chocolate sandwich cookies hold up well for icing and offer that familiar crunch. Double-stuffed adds even more creamy filling if desired. Always check for freshness a crisp cookie works best for decorating.
- Powdered sugar: Sifted for ultra-smooth royal icing. Fresher sugar will dissolve without gritty texture.
- Meringue powder: The secret to stable icing. Choose a pure quality brand for best flavor and texture.
- Warm water: Just enough to bring everything together. Use filtered water for clean taste.
- Food coloring gels: Gel varieties deliver bold color. Look for professional-grade gels for true colors and easy blending especially important for intricate skull designs.
- Edible markers: These help outline mouth and eyes for extra detailed skulls. Pick food-safe and fine-tip markers.
- Assorted sprinkles: Choose bright colors and different shapes for embellishing flowers or eyes on skulls. Check ingredient labels for quality and allergy information.
Tired of Takeout? 🥡
Get 10 meals you can make faster than delivery arrives. Seriously.
One email. No spam. Unsubscribe anytime.
Instructions
- Prepare the Royal Icing:
- In a mixing bowl combine powdered sugar meringue powder and water. Beat with an electric mixer on low speed for about 5 minutes until icing is glossy thick and forms stiff peaks. If the icing seems dry add water a few drops at a time until smooth.
- Tint the Icing:
- Divide icing into several small bowls. Add food coloring gels to each bowl mixing well to create a variety of bold vivid icing shades.
- Base Coat the Oreos:
- Using a small offset spatula or piping bag with a round tip spread or pipe a solid white layer of royal icing across the top of each Oreo. Make the surface as smooth as possible. Allow cookies to sit untouched for 10 to 15 minutes until the icing base has formed a crust.
- Decorate with Sugar Skull Designs:
- Switch to piping bags with fine tips or use clean toothpicks to add colored icing designs. Draw eyes mouth nose and floral or geometric details. Take your time with each cookie: step by step the skull theme comes alive as you build up each color and pattern.
- Add Details and Embellishments:
- Use edible markers to gently add outlines facial expressions or highlight small shapes on each skull. For final sparkle place colorful assorted sprinkles along flowers eyes or cheeks. Tap each sprinkle lightly into the icing so it sticks.
- Dry and Set:
- Let all Oreos dry at room temperature for at least 2 hours. Icing will harden and set smooth to the touch perfect for stacking or packing later.
 Save
Save Sugar Skull Oreos always remind me of my grandma's joy in seeing the finished platter she loved telling us stories of family Día de los Muertos altars filled with candied treats and these Oreos now brighten our table every year. My favorite is using deep magenta and turquoise icing shades to mimic traditional sugar skulls.
Storing Your Decorated Oreos
Lay Oreos in a single layer in an airtight container. Separate layers with parchment paper to prevent sticking. Cookies will stay fresh for up to five days at room temperature. If needed refrigerate but add a slip of parchment to protect icing from moisture. For longer storage wrap individually in cellophane.
Substitution Tips
You can use ready-made white chocolate-dipped Oreos for a neutral base perfect if you want extra sweetness or need a shortcut. For egg-free royal icing replace meringue powder with aquafaba powdered substitute or a vegan blend. Classic round sandwich cookies in other flavors like vanilla or golden work well for variation.
Serving Suggestions
Arrange Sugar Skull Oreos on a colorful platter with Mexican hot chocolate or spiced coffee. Pack them into small bags for party favors or layer in a tall glass jar for edible table centerpieces. They also make a fun addition to themed dessert boards with fruit and caramel popcorn.
 Save
Save Finish your Sugar Skull Oreos with bold colors and playful accents. Serve them at your next festive gathering for a memorable treat everyone will love.
Recipe FAQ Section
- → Can I use other types of sandwich cookies?
Yes, you can substitute Oreos with other chocolate or vanilla sandwich cookies for similar results.
- → How do you achieve vibrant icing colors?
Use gel food coloring for royal icing, mixing each shade in separate bowls for a bright palette.
- → What tools are needed for detailed designs?
Piping bags with fine tips, toothpicks, and edible markers help create intricate sugar skull patterns.
- → How long do decorated cookies need to dry?
Let decorated cookies sit at room temperature for at least 2 hours until the icing sets completely.
- → Are these cookies suitable for vegetarians?
Yes, these decorated Oreos are vegetarian if all decorative elements adhere to vegetarian standards.
- → Can I prepare them ahead for parties?
Absolutely. Once dry, store cookies in an airtight container up to several days before your event.