 Save
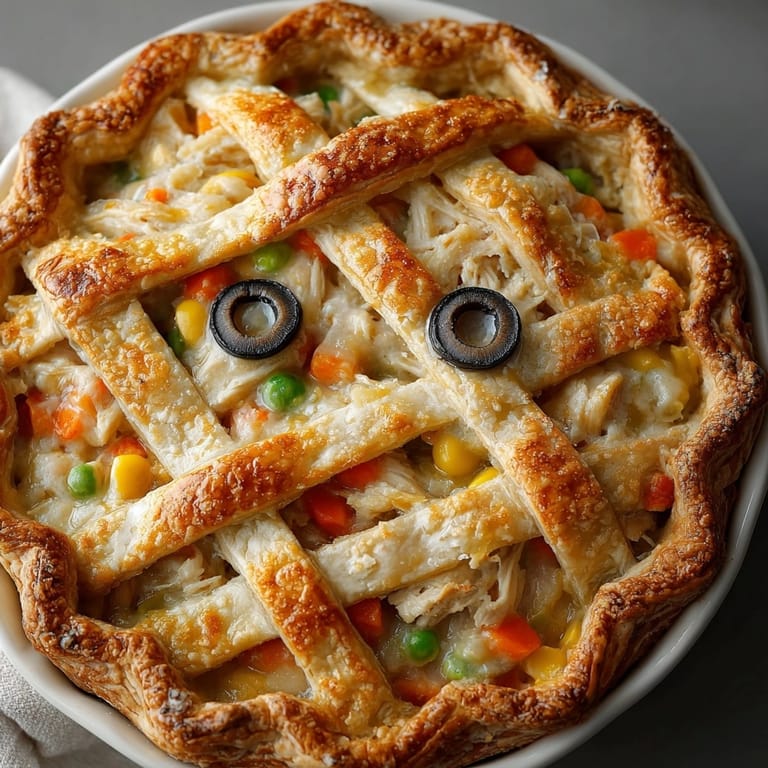
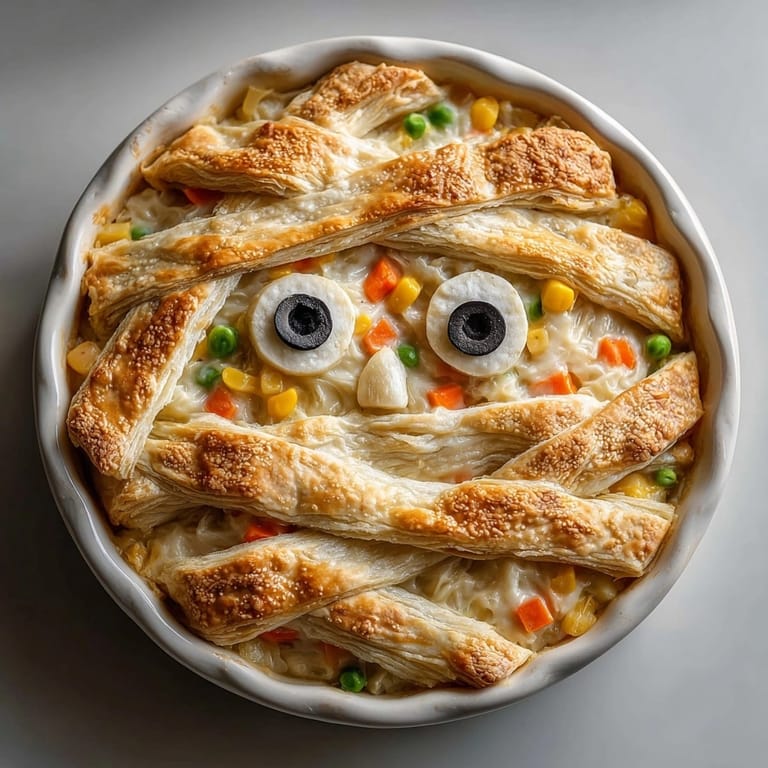
Save This Mummy Chicken Pot Pie turns a comfort classic into a festive centerpiece that will delight kids and impress your dinner crowd. Creamy chicken and vegetables tucked beneath flaky puff pastry "bandages" make it not just a meal but a playful conversation starter for Halloween or any family gathering. I love that it transports all the nostalgia of pot pie into a dish that feels both magical and cozy.
The first time I made this, my nieces insisted I let them put the "eyes" on. It quickly became our tradition. Kids never forget that special touch.
Ingredients
- Unsalted butter: adds richness and helps vegetables turn golden I always choose a European-style butter for creaminess
- Medium onion diced: provides a natural sweetness and flavor base Look for onions with tight skins to ensure freshness
- Garlic minced: infuses savory depth Fresh garlic works best—avoid pre-chopped jars if possible
- Carrots peeled and diced: bring color and subtle earthy flavor Choose firm carrots with rich orange color
- Celery diced: gives crunch and aromatic notes Crisp stalks with no brown spots are best
- All-purpose flour: thickens the filling and holds everything together Sift it if you see lumps
- Cooked chicken breast shredded: is the main protein I prefer poaching my own chicken for extra juiciness
- Frozen peas: add pop and gentle sweetness Use peas that are bright green for best flavor
- Chicken broth: builds layers of savory taste Homemade or low-sodium options keep salt balanced
- Whole milk: boosts sauce creaminess Full-fat milk gives the most luxurious finish
- Salt: highlights and balances every ingredient Use kosher salt for precise measurement
- Black pepper: brings gentle heat and sharpness Freshly ground makes the difference
- Dried thyme: provides a subtle herbal lift Rub between fingers to release more flavor
- Dried sage: gives a warm autumnal undertone Go light as sage can be strong
- Puff pastry: the key to a flaky fun crust Thaw in fridge overnight for perfect texture
- Egg beaten: for the glaze A high-quality egg yields a deep golden finish
- Black olives sliced: for the signature mummy eyes Choose glossy, firm olives for best look
Tired of Takeout? 🥡
Get 10 meals you can make faster than delivery arrives. Seriously.
One email. No spam. Unsubscribe anytime.
Instructions
- Prep the Oven:
- Preheat your oven to four hundred degrees Fahrenheit or two hundred degrees Celsius to get an even bake on your pie
- Sauté the Vegetables:
- Melt your butter in a large skillet over medium heat Once it begins to foam add onion garlic carrot and celery Stir often and cook about five minutes until everything is soft and starting to turn golden This brings out sweetness and builds your flavor foundation
- Make the Roux:
- Sprinkle flour straight onto the vegetables Stir constantly for one to two minutes You want the flour to smell slightly nutty This step thickens your filling later and prevents a raw flour taste
- Build the Filling:
- Slowly pour in chicken broth first then milk while stirring vigorously Watch for lumps and keep stirring until the mixture turns smooth Let it bubble for three to four minutes until it thickens It should coat the back of a spoon
- Add Chicken and Veggies:
- Stir in shredded chicken peas salt pepper thyme and sage Lower the heat and let it simmer for two to three minutes Everything melds together and the sauce gets creamy Remove from the heat
- Fill the Pie Dish:
- Spoon the hot filling into a nine inch round pie dish Spread it evenly so every slice will have the right balance
- Shape the Bandages:
- On a lightly floured work surface roll out your thawed puff pastry until it fits over your pie dish Using a pizza cutter or sharp knife cut long strips about one inch wide These will form your mummy "bandages"
- Decorate and Add Eyes:
- Arrange the pastry strips over the filling in a crisscross design Think of overlapping layers leaving a few open gaps for that perfect mummy look Place two black olive slices at one end to make "eyes" This really sells the theme
- Egg Wash and Bake:
- Brush the pastry strips generously with beaten egg This is your secret to a shiny professional golden top Slide the dish into your oven Bake for thirty five to forty minutes until the pastry is puffed and deep golden brown
- Rest and Serve:
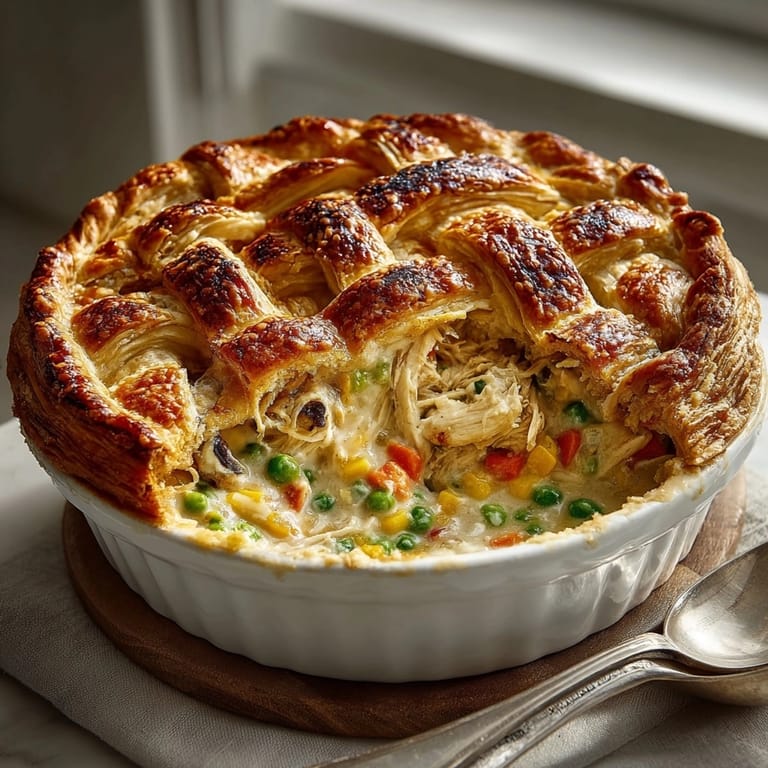
- Take the pie out and let it cool in the dish for ten minutes before cutting This helps the filling set and makes neat slices
 Save
Save My personal favorite is the buttery puff pastry because it gets irresistibly crisp and golden around the edges Family laughs always come out when someone gets a slice with extra "bandages"
Storage Tips
Store leftover pot pie tightly wrapped in the fridge for up to three days Reheat slices in a low oven so the crust stays flaky not soggy You can freeze the whole unbaked pie and simply bake from frozen for busy weeknights
Ingredient Substitutions
Swap mushrooms and chickpeas or even roasted sweet potato for chicken to make a vegetarian version Use oat milk or lactose-free milk for a dairy free filling Always check your puff pastry ingredients if avoiding soy or dairy
Serving Suggestions
Serve wedges of Mummy Chicken Pot Pie with a cool green salad or roasted root vegetables Older kids love it with homemade applesauce The playful look always sets the mood for a casual family night
Cultural Historical Context
Pot pie roots stretch back centuries as a way to make humble ingredients comforting and festive The mummy design lifts a rustic dish into something whimsical perfect for Halloween parties at home or classroom celebrations
Seasonal Adaptations
Add chopped butternut squash in autumn for a sweet twist Use shredded turkey after Thanksgiving or fresh spring peas in April Make mini individual mummy pies for parties Everyone loves biting into their own spooky portion Boost spices with a pinch of nutmeg or cayenne for warmth
Success Stories
Families come back to this recipe every Halloween Some turn it into a friendly competition for best pie "eyes" My twin nephews always ask for extra olives and fight over the crustiest slice
Freezer Meal Conversion
Assemble everything except for the egg wash Cover well and freeze for up to two months When ready to eat bake straight from frozen and extend baking time by ten to fifteen minutes Brush with egg just before baking so you still get that golden top
 Save
Save This festive pie always brings out big smiles and extra helpings. Enjoy seeing who gets the slice with the most "bandages" at your table.
Recipe FAQ Section
- → How do I create the mummy effect with pastry?
Slice puff pastry into strips and layer them crisscrossed on top of the pie filling, leaving small gaps for a 'bandaged' look.
- → Can I make this dish vegetarian?
Replace the chicken with cooked chickpeas or mushrooms and use vegetable broth to keep the flavors hearty and satisfying.
- → What herbs complement the filling?
Dried thyme and sage add aromatic depth. You can also include a pinch of cayenne for extra warmth.
- → Why add olive slices on top?
Sliced black olives create the mummy’s 'eyes,' offering a playful, spooky touch without altering the flavors.
- → How do I get a golden crust?
Brush the pastry strips with beaten egg before baking; this ensures a crispy, golden brown finish.
- → What kitchen tools are needed for preparation?
A large skillet, rolling pin, knife or pizza cutter, pie dish, and pastry brush make assembly easy and effective.