Save
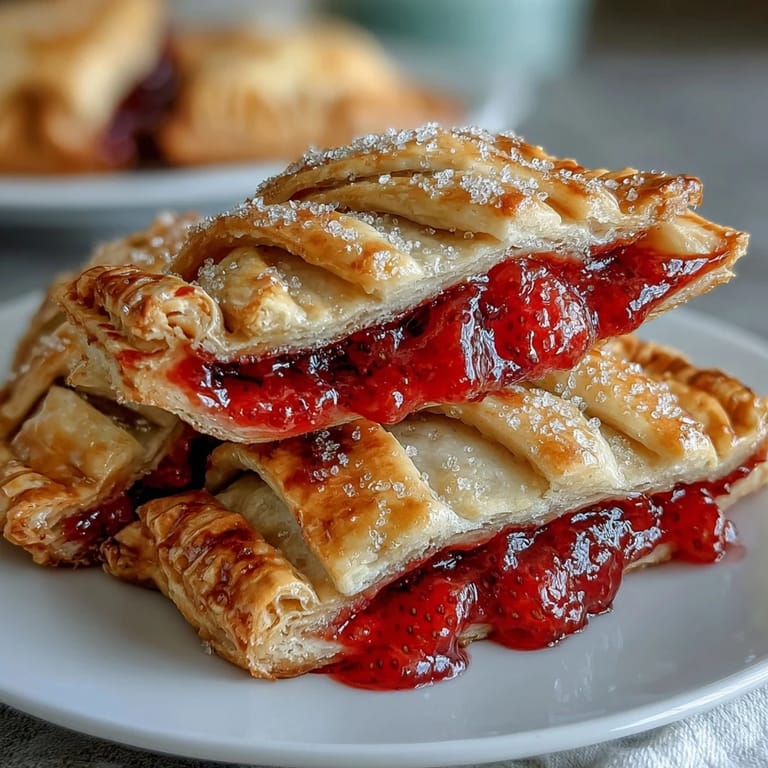
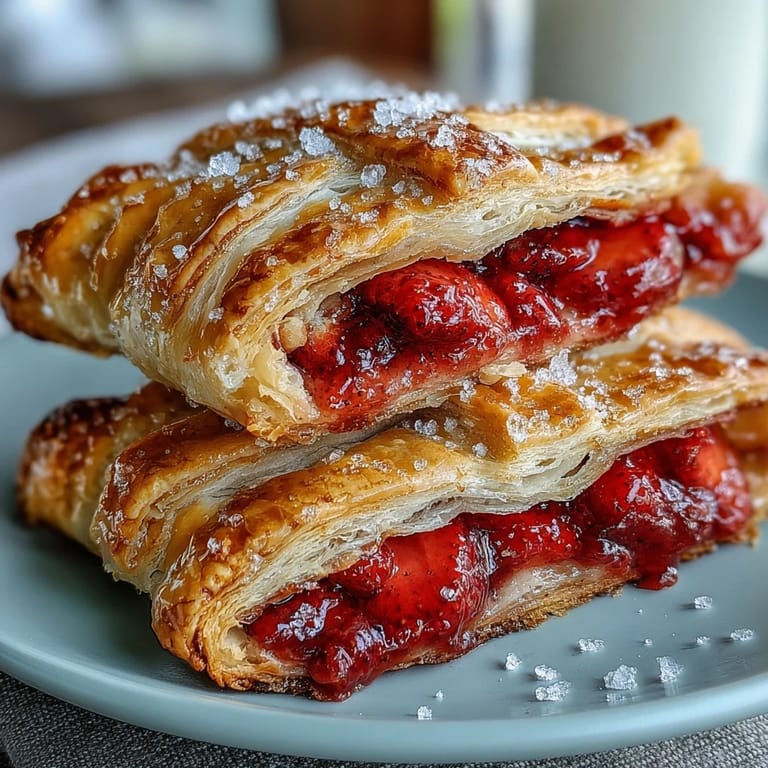
Save My sister texted me a photo of a farmers market strawberry stand last June, and suddenly I was standing in my kitchen wanting to make something that tasted like summer itself. These hand pies came together almost by accident that afternoon—I had dough chilling, berries on the counter, and about an hour before friends arrived. The lattice top felt like showing off without actually trying, and watching people bite into that crispy, flaky crust to find warm, juicy strawberries inside made me realize this was the kind of dessert worth making again and again.
I brought these to a camping trip where my friend Sarah took one bite and immediately asked for the recipe, then sat there in the morning sun eating two more before anyone else woke up. There's something about hand pies that makes people feel like you've given them a little gift, even though you were just tinkering around in your kitchen the day before. That's when I knew this recipe needed to be written down and shared.
Ingredients
- All-purpose flour: The backbone of a tender, flaky crust—I always measure by weight if I can, because it's the difference between dough that's too tough and dough that practically melts.
- Cold unsalted butter: This is non-negotiable; the pieces should stay separate in the dough, which is what creates those delicate, shattered layers when baked.
- Ice water: Add it slowly and sparingly—you're aiming for dough that just barely holds together, not a wet ball.
- Fresh strawberries: Pick the ones that smell like strawberries, not the pale supermarket ones that taste like watery sadness.
- Cornstarch: The unsung hero that keeps your filling from turning into berry soup inside the pastry.
- Lemon juice: A small squeeze that brightens everything and keeps the filling from tasting one-dimensional.
- Coarse sugar: It catches the light as the pies bake and adds a subtle crunch that regular sugar can't quite deliver.
- Egg wash: A simple brush of beaten egg gives that golden, professional-looking finish that made people ask if I bought them.
Tired of Takeout? 🥡
Get 10 meals you can make faster than delivery arrives. Seriously.
One email. No spam. Unsubscribe anytime.
Instructions
- Mix and cut the dough:
- Whisk your dry ingredients together, then work in the cold butter until it looks like rough sand with some pea-sized pieces still visible. The scattered butter pieces are what create those flaky layers, so don't overmix or you'll lose that magic.
- Bring the dough together:
- Add ice water one tablespoon at a time, mixing gently until the dough just barely holds together when you squeeze it. It should look shaggy and slightly rough, not smooth and polished.
- Chill like your life depends on it:
- Divide the dough in half, flatten into disks, wrap them up, and let them rest in the fridge for at least an hour. This step is when the gluten relaxes and the butter stays firm, both things that make your crust flake like it's supposed to.
- Prepare your filling:
- Toss the diced strawberries with sugar, cornstarch, lemon juice, vanilla, and salt, then let them sit for 10 minutes so they release their juice and the cornstarch can work its thickening magic.
- Roll and cut:
- Work with one dough disk at a time on a floured surface, rolling it thin and even. Cut out 8 pieces—rectangles, circles, whatever shape makes you happy—and place them on your parchment-lined baking sheet.
- Fill with restraint:
- Spoon 2 to 3 tablespoons of strawberry filling onto the center of each piece, leaving a clear border around the edges so the filling doesn't escape during baking.
- Create the lattice:
- Roll out your second dough disk and cut matching shapes, then slice each one into thin, even strips. Weave them over the filled bottoms in a crosshatch pattern—it looks impressive but it's really just over-and-under, like you learned in elementary school.
- Seal and crimp:
- Press the edges of each pie firmly to seal in the filling, then use a fork to crimp around the perimeter, which both seals and decorates in one satisfying move.
- Brush and sprinkle:
- Give each pie a light brush of beaten egg and a generous sprinkle of coarse sugar, which will toast up and catch the light while baking.
- Bake until golden:
- Slide them into a 400°F oven for 22 to 25 minutes, watching for that moment when the crust turns golden and the filling starts to bubble slightly at the edges. That's your signal that everything inside is hot and the thickening is complete.
- Cool before serving:
- Let them rest on a wire rack for at least 15 minutes so the filling sets and the crust cools to a temperature where it won't burn your mouth.
 Save
Save There was this moment at that camping trip when someone held up a hand pie and said, 'This is what summer tastes like,' and I realized I'd accidentally created one of those recipes that becomes a tradition. Now people text me when strawberry season starts, asking if I'm making them again.
Troubleshooting Common Issues
If your filling leaks out during baking, it usually means either too much filling or the edges weren't sealed tightly enough. Next time, be more conservative with the amount and really press those edges together before crimping.
If your crust turns golden but the edges are burning before the top is done, tent the whole baking sheet loosely with foil for the last 5 to 10 minutes. This happens sometimes with darker baking sheets that conduct heat more aggressively.
Make-Ahead and Storage
You can assemble these pies the night before and keep them in the fridge covered with plastic wrap, which actually gives the dough even more time to chill and relax. Bake them straight from the fridge—add an extra minute or two to the baking time since they're starting cold.
Leftovers stay good in an airtight container at room temperature for two days, though honestly they rarely last that long. If you want to freeze them after baking, wrap them individually in foil and freeze for up to a month; reheat gently in a low oven to restore the crust.
Variations and Flavor Swaps
Once you've made these once, you'll start seeing possibilities everywhere. I've done mixed berry versions with half strawberries and half blueberries, switched half the sugar to brown sugar for a deeper flavor, and even added a tiny pinch of cardamom to the filling because I was feeling adventurous.
If you're short on time or intimidated by pie dough, store-bought works and no one needs to know your secret. The lattice top is what makes them look special anyway, and that's entirely you.
- A dusting of cardamom or cinnamon in the filling creates an unexpected warmth that people will try to figure out.
- If berries are out of season, frozen strawberries work—just thaw them and drain excess liquid before using.
- Serve these with fresh whipped cream or vanilla ice cream, and watch people become very happy.
 Save
Save These hand pies have become the dessert I reach for when I want something that feels both effortless and special, the kind of thing that makes people smile when you hand it to them. If you make them once, I promise you'll be making them again.
Recipe FAQ Section
- → How do I make the dough flaky?
Use cold butter cut into the flour until crumbly and refrigerate the dough before rolling to maintain a flaky texture after baking.
- → Can I use frozen strawberries for the filling?
Fresh strawberries are best for texture, but if using frozen, thaw and drain excess liquid to prevent sogginess.
- → What is the purpose of the lattice top?
The lattice top allows steam to escape while baking and creates an attractive golden, crisp finish.
- → How do I prevent the filling from leaking?
Leave a border around the filling when assembling and press edges firmly with a fork to seal the pies well.
- → Can other berries be used in place of strawberries?
Yes, blueberries or raspberries can be substituted or combined for a mixed berry variation.