 Save
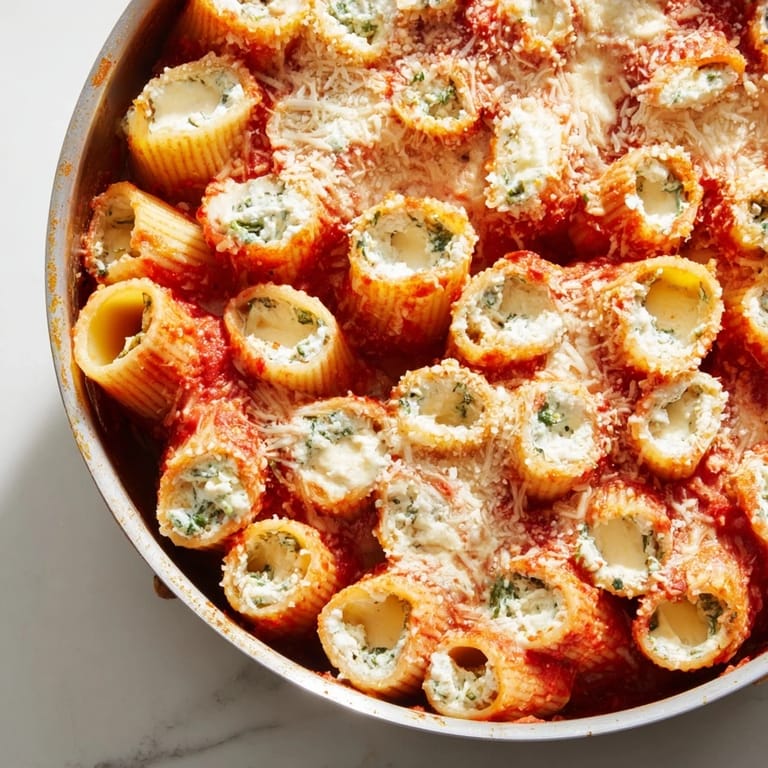
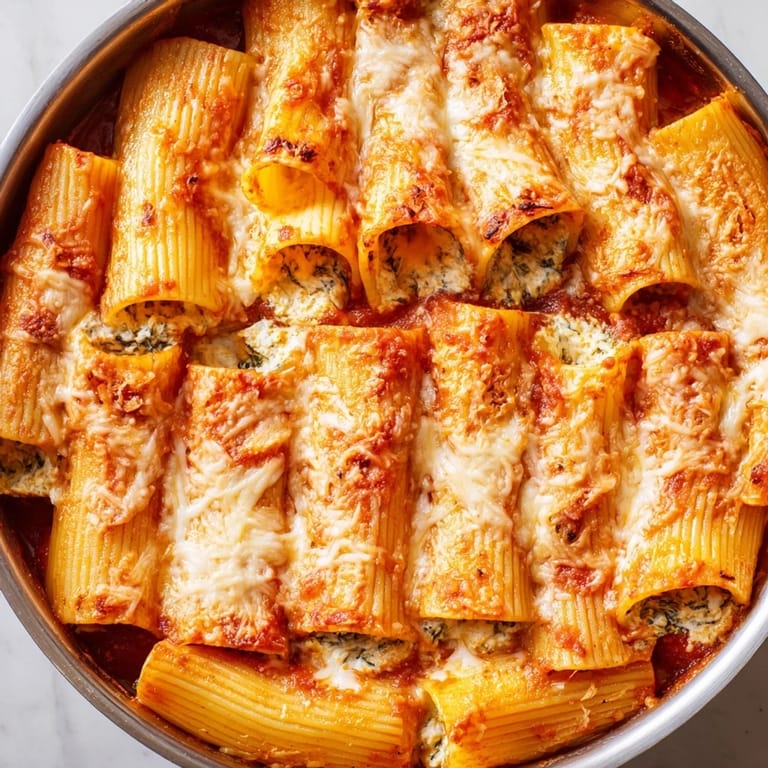
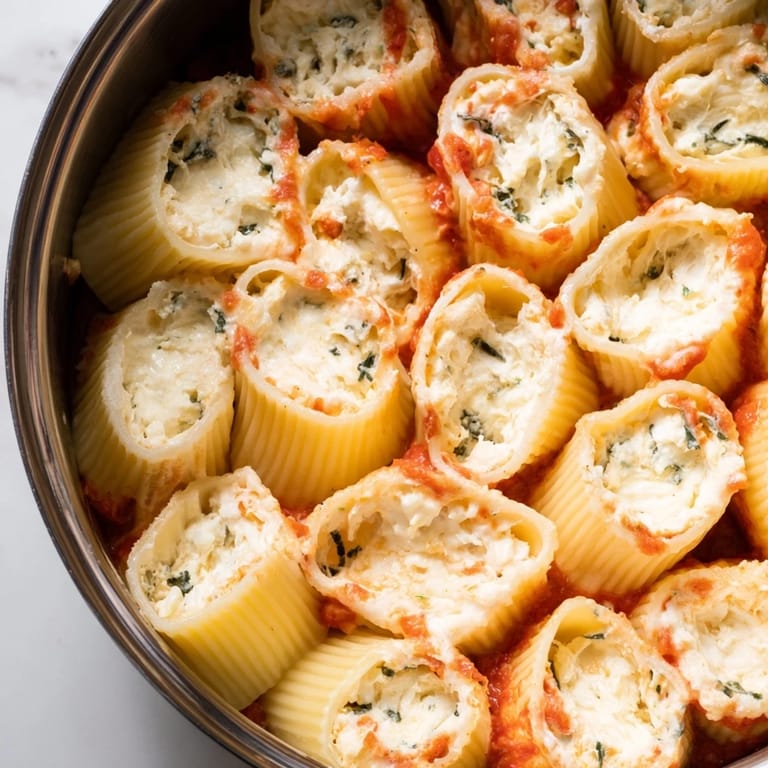
Save The first time I stood a handful of rigatoni tubes upright in a baking dish, I felt like I was building something architectural rather than cooking dinner. My sister watched from across the kitchen counter, skeptical, until that golden honeycomb of pasta emerged from the oven an hour later—each tube a perfect vessel of creamy cheese, the whole thing glistening under marinara and melted mozzarella. It was the kind of dish that looks far more complicated than it actually is, which is exactly why it became one of my favorite ways to impress people without spending all evening in the kitchen.
I made this on a rainy Wednesday when I was supposed to be meal prepping for the week and somehow ended up with something fancy enough for a dinner party. My partner came home to the smell of toasted cheese and basil filling the apartment, and before I could even explain what I was making, they were already setting the table and opening wine. That's when I knew this recipe was a keeper—when it had enough presence to stop someone in their tracks.
Ingredients
- Rigatoni: The larger tubes are essential here—they need to stand upright without tipping and have enough interior space to hold a generous spoonful of filling.
- Ricotta cheese: The creamy backbone of your filling, and it's worth buying the good stuff because you taste the difference when there's nothing else to hide behind.
- Mozzarella (grated): Mixed into the filling, this gives everything a subtle elasticity that keeps the filling from being too grainy.
- Parmesan cheese: Sharp and salty, it cuts through the richness and reminds your palate that cheese has texture and opinion.
- Fresh egg: Binds everything together without making it heavy, and makes the filling set just right as it bakes.
- Fresh basil and parsley: These aren't optional—they're what transform the filling from one-note to genuinely alive.
- Marinara sauce: Choose one you'd actually eat from a spoon; it's the flavor backbone of the whole dish.
- Shredded mozzarella for topping: This is your golden-brown promise—use whole milk mozzarella if you can, and don't skimp.
- Olive oil: A good drizzle prevents the pasta from sticking and adds a whisper of richness.
Tired of Takeout? 🥡
Get 10 meals you can make faster than delivery arrives. Seriously.
One email. No spam. Unsubscribe anytime.
Instructions
- Prepare your stage:
- Heat your oven to 200°C (400°F) while you grease your springform or deep round pan with olive oil and line the bottom with parchment. Having everything ready before you start cooking is not fussy—it's the difference between flowing smoothly and scrambling.
- Cook the pasta just shy:
- Boil your rigatoni for two minutes under the package time so they're still firm enough to stand and hold filling without bursting. Drain them, toss with a touch of olive oil, and let them cool just enough to handle.
- Make your creamy filling:
- Combine ricotta, grated mozzarella, Parmesan, egg, basil, and parsley in a bowl and mix until it's smooth and cohesive. Taste it—this is your moment to adjust the salt and pepper to your liking.
- Build your honeycomb:
- Stand the cooked rigatoni upright in your prepared pan, packing them tightly so they support each other and fill the entire space. They should fit snugly enough that none of them can tip or shift once the sauce hits them.
- Fill each tube:
- Transfer your cheese mixture to a piping bag or a zip-top bag with the corner snipped off, then pipe generously into each pasta tube until it's level with the top. Work your way around the pan methodically—there's something meditative about filling them one by one.
- Pour and settle:
- Distribute your marinara sauce evenly over the filled pasta, then tap the pan gently a few times so the sauce trickles down between the tubes and reaches the bottom. This ensures every layer gets flavor and moisture.
- Top with cheese:
- Sprinkle shredded mozzarella across the entire surface, then scatter grated Parmesan over the top for extra richness and browning power.
- Bake in two stages:
- Cover loosely with foil and bake for 25 minutes so the pasta heats through and the filling sets without drying out. Remove the foil and bake another 10 minutes until the cheese is bubbly and golden and you can see the sauce bubbling at the edges.
- Rest before serving:
- Let the bake sit for 10 minutes so the filling firms up slightly and the whole thing becomes easier to slice and serve. This isn't wasted time—it's when the dish finishes cooking gently and all the flavors settle.
 Save
Save There was a moment, maybe five minutes before serving, when I realized this dish had become something more than a recipe in my kitchen—it was a small act of care. Watching someone bite into a tube of pasta and hit that perfect center of creamy, herb-flecked filling, surrounded by sauce and melted cheese, felt like the point of cooking had finally revealed itself.
Variations That Work
I've learned that this bake is forgiving enough to welcome additions without losing its character. Sautéed spinach folds into the filling and adds color and mineral depth, while crumbled Italian sausage turns it into something heartier. Some nights I'll stir in roasted garlic or fresh lemon zest—small shifts that feel like cooking to your mood rather than following a formula. The marinara is flexible too; use whatever sauce you trust, even homemade if you have it waiting in your freezer.
Why This Works Structurally
The genius of standing the pasta upright is that it changes how heat moves through the dish. The tubes conduct warmth directly to the filling while the sauce surrounds everything, creating layers of texture and temperature that you can't get from a traditional baked ziti. The springform pan, meanwhile, is a small kindness—it lets you release the whole thing without wrestling or scraping, and when you slice it, each piece holds its shape and shows off that honeycomb pattern.
Serving and Pairing
This dish arrives at the table looking almost too beautiful to eat, which means it's perfect for those moments when cooking needs to feel like an event. A simple green salad with lemon vinaigrette cuts the richness without competing, and a glass of Chianti or another medium-bodied red wine is all you need to call it dinner. I've also learned that this bake scales beautifully if you're feeding more people—just use a larger pan and trust the same timing.
- Slice while the bake is still warm but not piping hot, so the cheese sets enough to hold together but stays creamy in the center.
- If you have leftovers, cover them loosely and refrigerate, then reheat gently in a low oven so the pasta doesn't toughen.
- This is the kind of dish that's just as good at room temperature the next day, if you find yourself sneaking cold slices straight from the fridge.
 Save
Save This is the kind of recipe that reminds you why cooking matters—not for the nutrition facts or the time saved, but for the moment when something you made with your own hands becomes a memory someone carries forward. Make it once, and I promise you'll make it again.
Recipe FAQ Section
- → What pasta works best for this bake?
Use rigatoni or other large tubular pasta to stand upright and hold the cheese filling well.
- → How should the pasta be cooked before baking?
Cook the pasta slightly under al dente so it holds shape during baking and doesn’t become mushy.
- → Can I add vegetables to the filling?
Yes, sautéed spinach or mushrooms can be incorporated for extra flavor and texture.
- → What type of cheese yields the best filling texture?
A mix of ricotta, mozzarella, and Parmesan provides creaminess, meltability, and flavor depth.
- → How long should the dish rest after baking?
Allow 10 minutes standing time to set before slicing, ensuring neat portions and rich flavor.
- → Can this dish be prepared ahead?
Yes, assemble and refrigerate before baking. Bring to room temperature and adjust baking time accordingly.